JAMS manual

The JAMS manual provides a background of and contains the admin and user guides for the Jami Account Management Server. The Jami Account Management Server (JAMS) enables Jami to be easily deployed in any enterprise and allows users to connect using their centralized credentials and create local accounts. JAMS allows all enterprises to manage their own Jami community while taking advantage of Jami’s distributed network architecture.
Download JAMS manual
Language |
Print file format |
Source file format |
|---|---|---|
en-US (English) |
Additional guides
Introduction
JAMS is a server application used to enroll Jami clients in an enterprise environment. Currently, JAMS supports 3 sources for user authentication:
Lightweight Directory Access Protocol (LDAP),
Active Directory (AD), and
An embedded database.
Obtaining JAMS
The latest version of JAMS can be downloaded at https://jami.biz/. The source code is available at https://git.jami.net/savoirfairelinux/jami-jams.
System requirements
| Requirement | Details |
|---|---|
| Processor | 1 gigahertz (GHz) or faster with 1 or more cores on a compatible 64-bit processor or System on a Chip (SoC). |
| RAM | 4 gigabytes (GB). |
| Storage | 1 gigabyte (GB) of available storage space. |
| Operating system | GNU/Linux, Apple macOS, or Microsoft Windows. |
| Java | Version 11 or higher. |
| Database | LDAP-compatible directory (such as OpenLDAP), Microsoft Active Directory (AD), or a local embedded database. |
JAMS concepts
JAMS was built with security in mind; therefore, it is intimately related to the X.509 certificate management workflows.
The central concepts that are used in JAMS are:
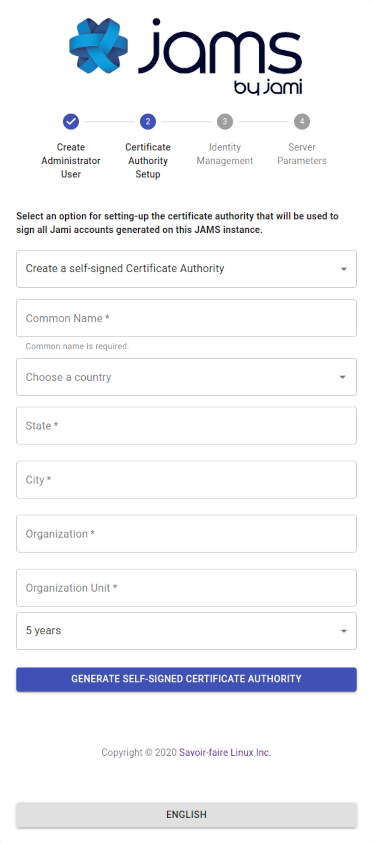
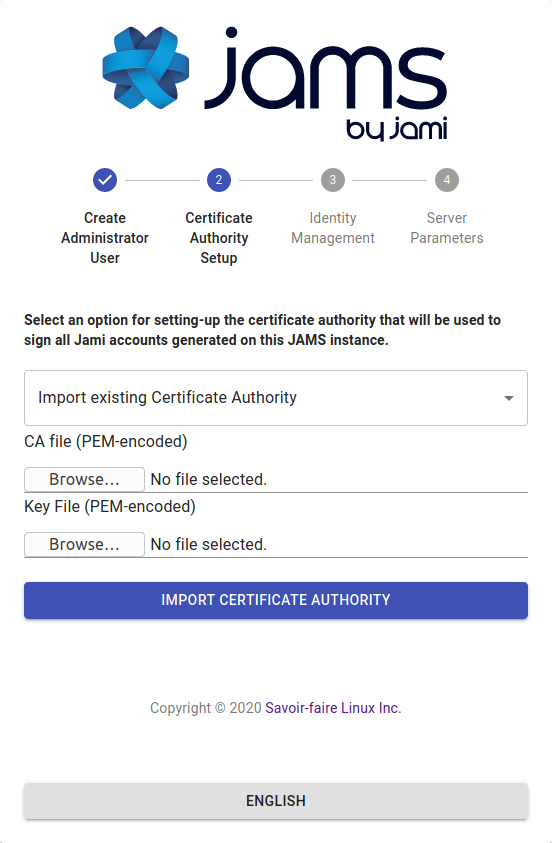
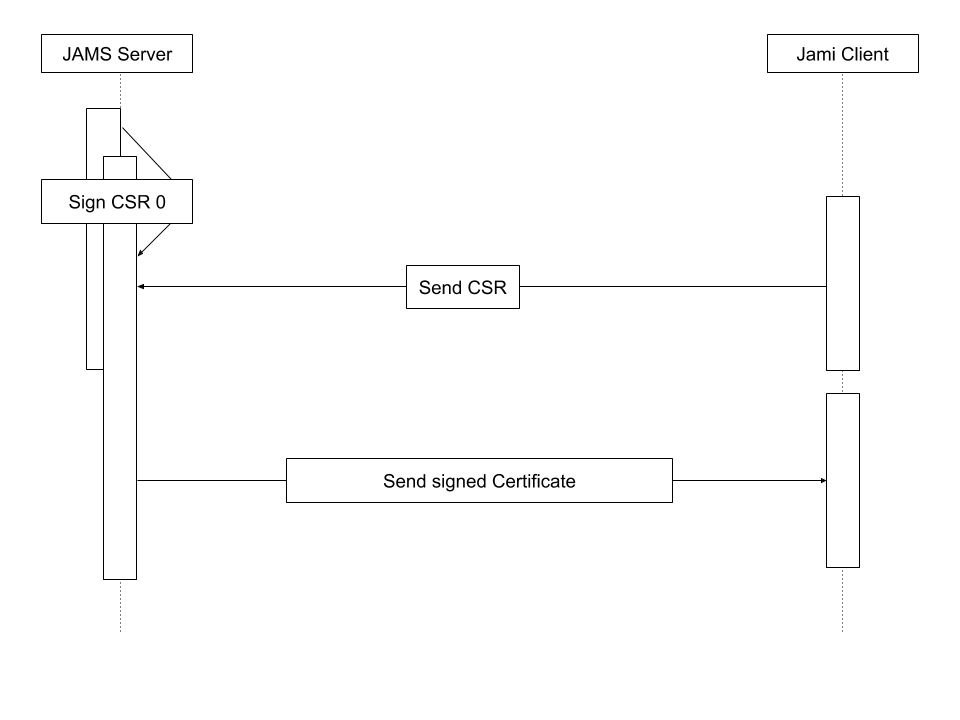
In the JAMS paradigm, a device (Jami client) requests a certificate from the server and then presents it to other devices to be recognized as a valid member of the organization. Therefore, JAMS must be provided with a certificate authority in order to work properly.
In order to be completely secure, JAMS does not generate certificates for devices. JAMS instead issues certificates based on a certificate signing request sent to it by the device. This therefore removes the requirement to send a private key over the wire.
The following diagram shows the entire process of how a device enrolls with JAMS:
Getting started
Download the latest version of JAMS from https://jami.biz/.
Unpack the
.tarfile to any directory.It is mandatory to run JAMS using a secure SSL connection.
A domain name is required to request a key and a certificate. A domain name can be purchased if one is not available. Set the domain name to point to the server before proceeding to the next step.
A pair of key certificates can be purchased from any online provider. However, obtaining a free pair using Let’s Encrypt is recommended.
In order to generate a pair of key certificates, Certbot can be used following the instructions on the https://certbot.eff.org/ page.
Certbot will provide specific instructions when the web server software and operating system are entered.
Install Certbot using snap:
sudo snap install --classic certbot
Ensure that the Certbot command can be run:
sudo ln -s /snap/bin/certbot /usr/bin/certbot`
In order to get a certificate, execute:
sudo certbot certonly
and follow the instructions.
The certificate and key are generated in a specific folder; please see the output from Certbot to locate them.
It is required to copy them in the current folder where the jams-launcher.jar file is located.
Current limitation
JAMS currently does not support reading encrypted private keys that require a password unlock.
Navigate to the directory where the JAMS package has been extracted and execute the following command:
java -jar jams-launcher.jar PORT SSL_CERTIFICATE SSL_CERTIFICATE_KEY
| Argument | Details |
|---|---|
| PORT | The TCP port on which JAMS is to listen for incoming connections. |
| SSL_CERTIFICATE | The location of the PEM-formatted SSL Certificate file. |
| SSL_CERTIFICATE_KEY | The location of the PEM-formatted key file, which is used with the SSL Certificate file from above. |
An example of the command would be:
java -jar jams-launcher 443 server.pem server.key
Note
Any port above 1024 can be safely used to run JAMS.
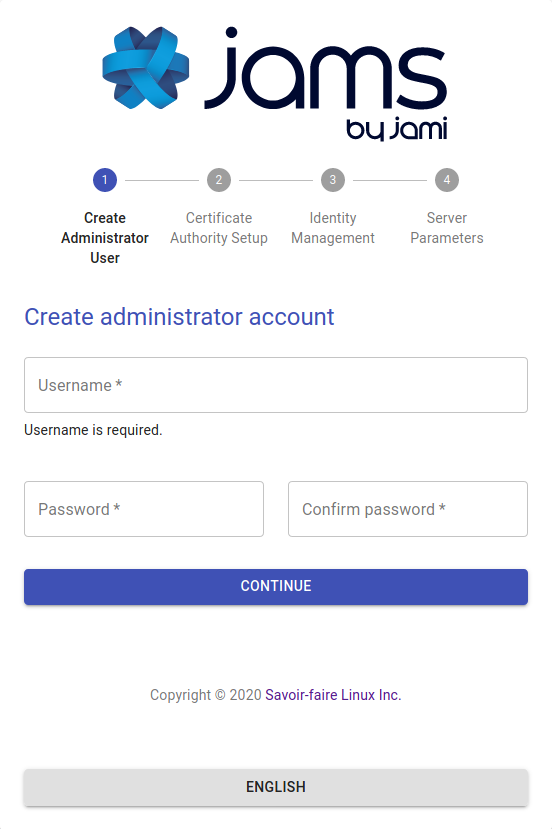
Step 1: Create an administrator account
The administrator account manages Jami users and groups.
Step 3: Set up the user database
JAMS supports 3 different sources for the authentication of users:
LDAP-compatible directory (such as OpenLDAP)
Microsoft Active Directory
Local embedded database
Option 1: Lightweight Directory Access Protocol (LDAP)
If the enterprise provides an LDAP directory for user management, it is required to know its access information and an automated account that has read-only rights to do use look-ups.
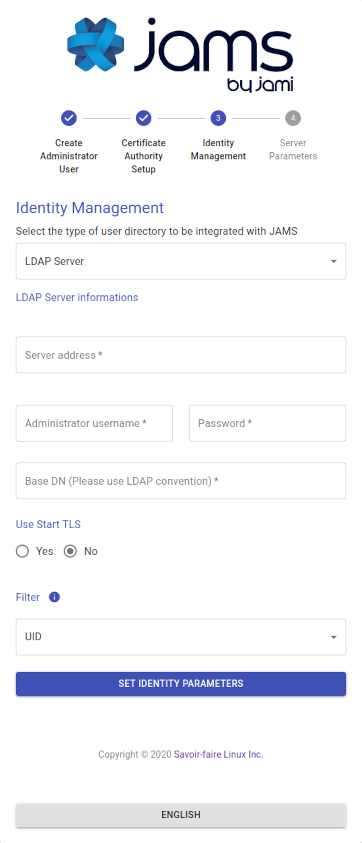
The admin should provide most of the required information; however, the following is a detailed overview of each field:
| Field | Details |
|---|---|
| Use StartTLS | The LDAP server can be configured to use either TLS/STARTTLS or PLAIN sockets; if STARTTLS is used, mark the value as true. |
| Server Address | The address of the server with respect to the JAMS server, the LDAP is not required to be publicly accessible but should be accessible to JAMS.
Either ldap:// or ldaps:// should precede the address. |
| Port | The port on which the LDAP server is listening for requests (usually 389 for PLAIN/STARTTLS and 636 for SSL/TLS). |
| Administrator Username | This is NOT the LDAP's administration account credentials but the credentials of the account that has read permissions to the LDAP database in order to look up users.
The format is generally cn=bot,ou=robots,dc=domain,dc=org. |
| Password | The password used by the account above. |
| BaseDN | The base realm where the user accounts are located; in most cases, it is ou=users,dc=enterprise,dc=org. |
Option 2: Microsoft Active Directory (AD)
If the enterprise provides Active Directory (AD) for user management, it is required to know its access information and an automated account that has read-only rights to do use look-ups.
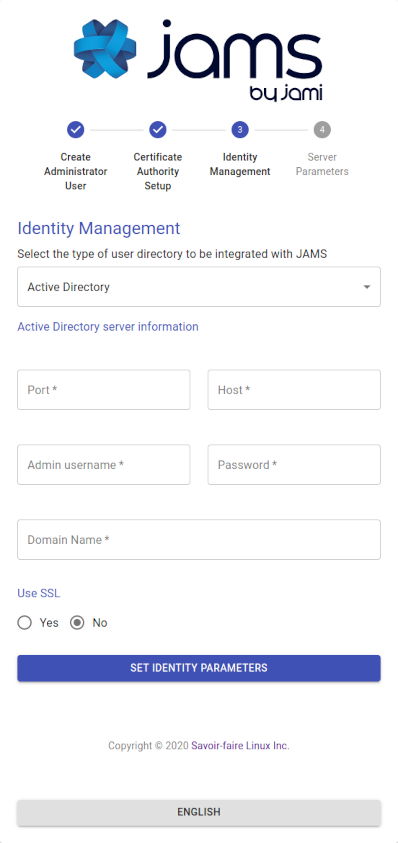
The admin should provide most of the required information; however, the following is a detailed overview of each field:
| Field | Details |
|---|---|
| Port | The port on which Active Directory (AD) is listening (generally it is either 389 or 636). |
| Host | The address of the server with respect to the JAMS server, the Active Directory (AD). It not required to be publicly accessible but should be accessible to JAMS. |
| Administrator Username | This is NOT the Active Directory's administration account credentials but the credentials of the account that has read permissions to the Active Directory database in order to look up users.
The format is generally cn=bot,ou=robots,dc=domain,dc=net. |
| Password | The password used by the account above. |
| Use SSL | Whether the server uses SSL for data transmission. |
| Domain Name | This is the legacy-formatted Windows Domain Name (i.e., WINDOMAIN). |
Option 3: Local embedded database
The local database does not require any additional configuration; everything in the process is automated. This option allows for the creation of Jami users on the fly directly from the JAMS interface.
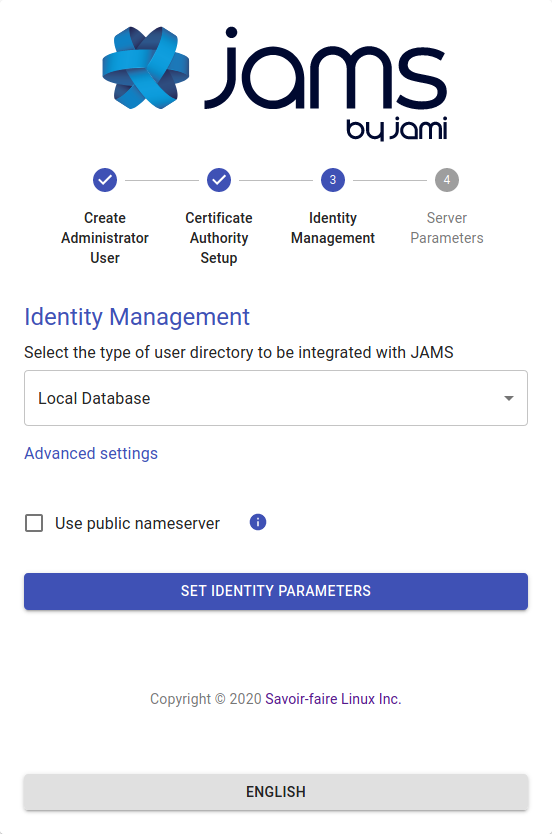
Advanced settings
By default, the “Use public name server” option is disabled. Jami usernames of JAMS users will not be stored on the public Jami name server. Users can communicate with users outside the organization by using their 40-character fingerprint. Enable this option to allow JAMS users in the organization to also search for external users on the public name server.
Step 4: Set up the server parameters
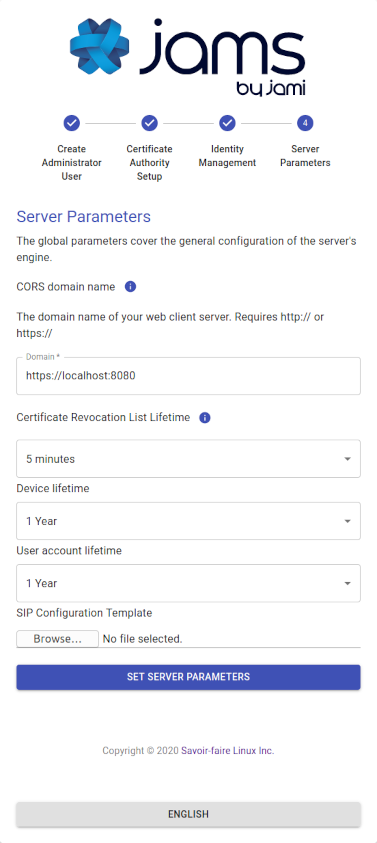
| Parameter | Details |
|---|---|
| CORS Domain Name | The domain on which the JAMS client and administration UI will be running. |
| Certificate Revocation List Lifetime | The frequency at which the CRL is updated in memory. |
| Device Lifetime | How long a device's certificate is valid before being considered stale and requiring re-enrollment. |
| User Account Lifetime | How long a user account is valid before being considered stale and requiring re-enrollment. |
Important
The CORS Domain Name corresponds to the web address used to access the Web UI. By default, it is set to the same URL address as the one where JAMS is deployed. Only set a different URL address if the Web UI has a different URL address from the one where JAMS is deployed.
Select the Set Server Parameters button to finalize the configuration and be redirected to the JAMS interface.

If JAMS has been configured with an LDAP database or Active Directory (AD), the list of users in the organization should be visible in JAMS. If JAMS has been configured with a local embedded database, new users can be created by selecting the Create User button.
Private DHT node
The JAMS server does not provide an OpenDHT bootstrap node. OpenDHT is required to be installed to provide bootstrap functionality.
If the network no longer has Internet access, clients should be able to communicate with this single DHT node, but it can take some time (10-15 minutes) to update the table.
The DHT is only used to allow nodes to find each other: data is sent P2P or through a TURN server. If required, the TURN server is installed separately.
